OptiX CUDA CMake Project Workflow
I normally create native Visual Studio projects (.vcxproj and .sln) to develop OptiX applications. Recently, for a path tracer project, I used a Visual Studio CMake project instead and it took me quite a while to get everything set up. In this article I describe two workflows that I put together. Some items are specific to Windows and Visual Studio, but most of the setup will work across platforms.
- Setup
- Project structure
- C++ compilation
- Standard CUDA to PTX workflow
- Advanced CUDA to PTX workflow
- Copying resources
- Avoiding any copying of resources (Windows specific)
- Cleaning
- Installation
- Conclusion
1. Setup
My development machine runs Windows 11 and I have the following installed:
Visual Studio Community 2022 v17.9.1
CMake 3.28.3
CUDA 12.3
OptiX 7.1
I will be using CMake with the Ninja generator (v1.10.2) and I will be compiling my Optix CUDA files to PTX.
1.1 OptiX
I have several OptiX versions installed, coexisting peacefully. I create a user environment variable for each version, specifying its path:
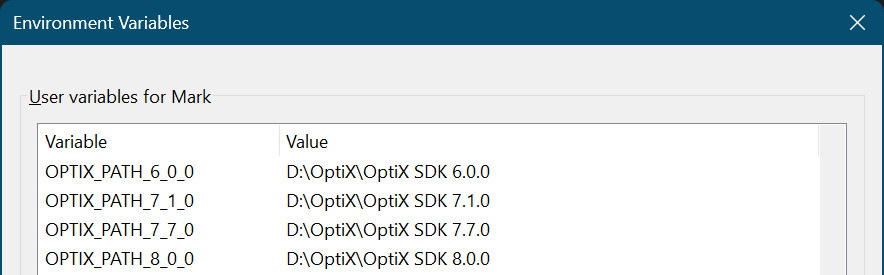
These environment variables come in handy inside CMakeLists.txt because CMake does not have a built-in find_package command for OptiX. In CMakeLists.txt the environment variable for OptiX 7.1 is accessed as $ENV{OPTIX_PATH_7_1_0}.
Note that I do not install OptiX in the default location chosen by the installer (in C:\ProgramData) because that can mess up dependency handling. While playing around with dependency files I discovered that header files located in C:\ProgramData always appeared to be out of date, so my project was always being rebuilt even though nothing had changed.
1.2 Visual Studio CMake project
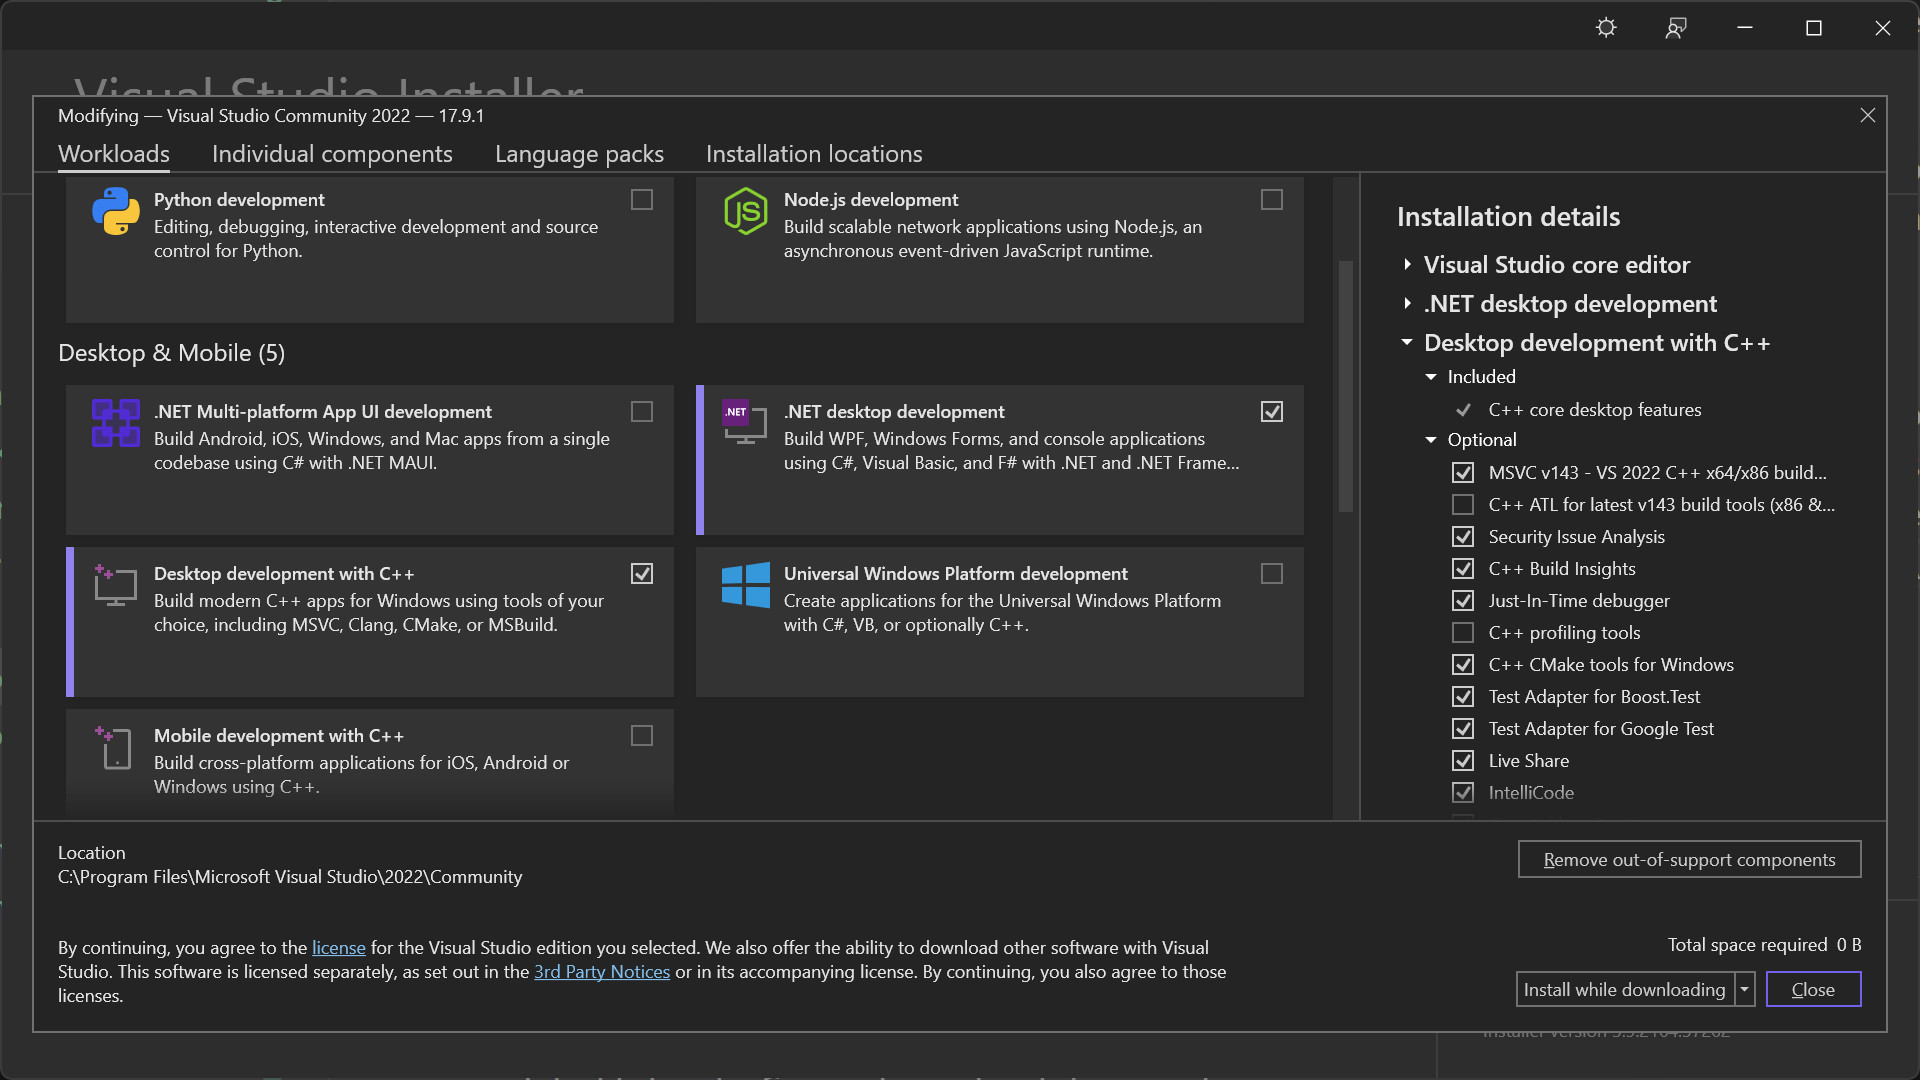
To get a “CMake Project” template when creating a new Visual Studio project you need to have “C++ CMake tools for Windows” installed. Go to “Tools” | “Get Tools and Features…” from the menu. This will launch the installer app where you can add components to Visual Studio. Under “Workloads” you need to have “Desktop development with C++” ticked. In the “Installation details” pane on the right, under “Desktop development with C++” | “Optional”, tick “C++ CMake tools for Windows”.
Now when you create a new Visual Studio project, you can specify “CMake Project”.
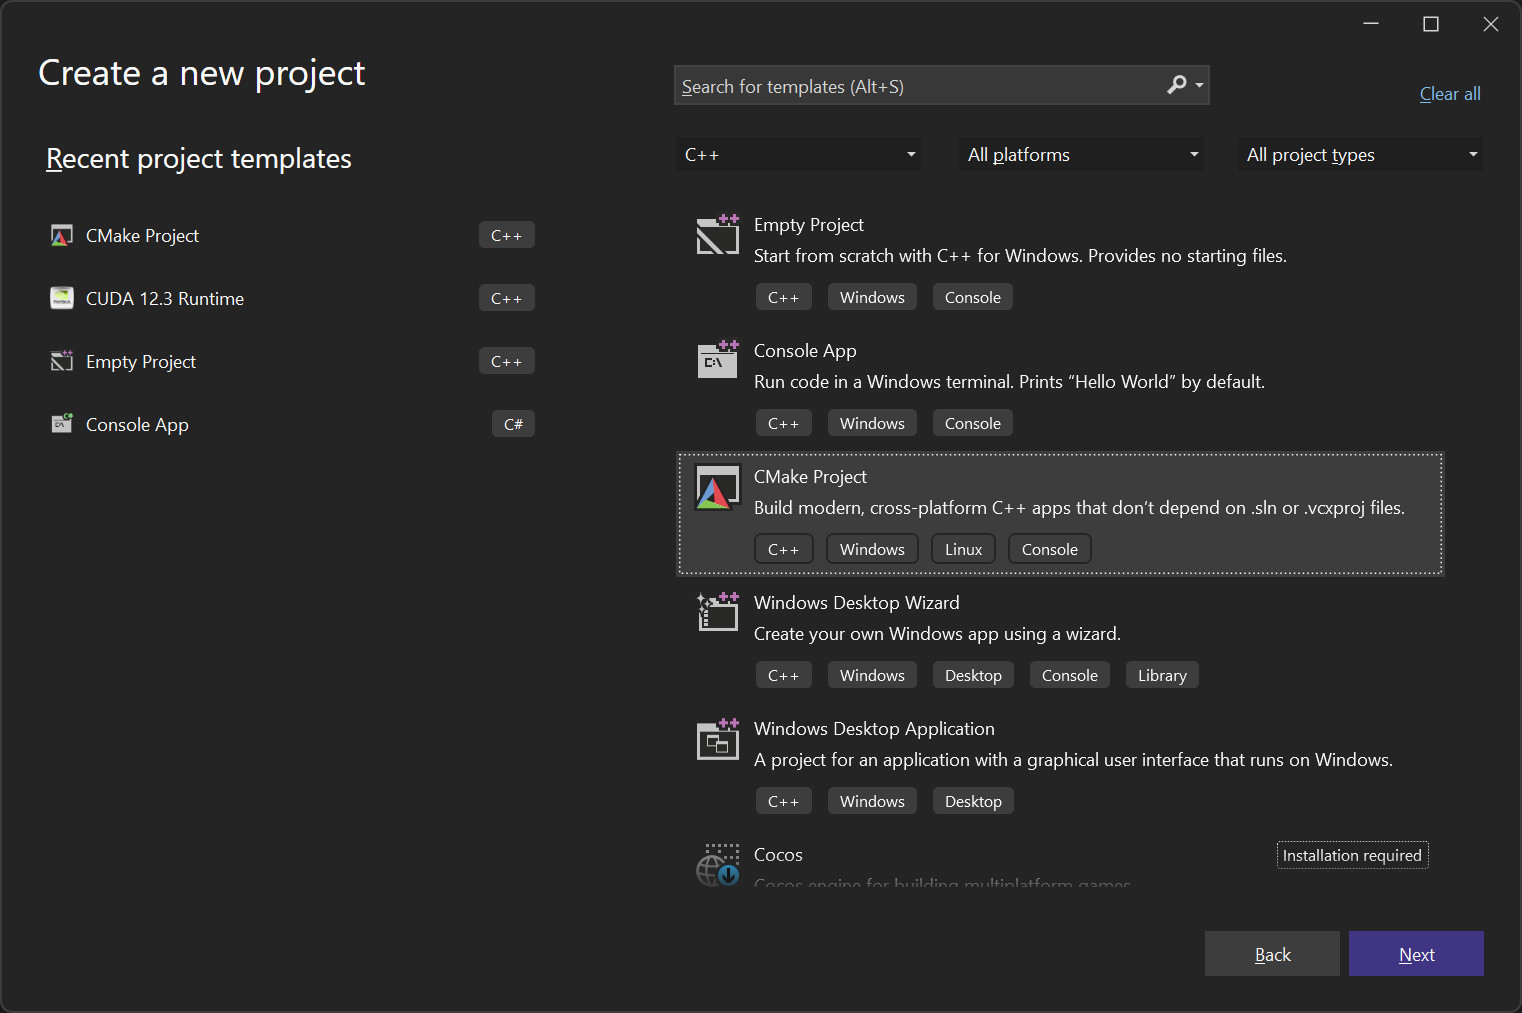
The project created in this way has some dummy source code (a .cpp file and a .h file), a barebones CMakeLists.txt and a CMakePresets.json file. The dummy source code files can be deleted right away as they will be replaced by your own sources. The contents of CMakeLists.txt can be discarded too as you would want to write your own from scratch. Keep the CMakePresets.json as it is decent and useful.
1.3 CMakePresets.json
The CMakePresets.json file is useful for creating configuration and build presets or variants. This is what the default CMakePresets.json looks like.
{
    "version": 3,
    "configurePresets": [
        {
            "name": "windows-base",
            "hidden": true,
            "generator": "Ninja",
            "binaryDir": "${sourceDir}/out/build/${presetName}",
            "installDir": "${sourceDir}/out/install/${presetName}",
            "cacheVariables": {
                "CMAKE_C_COMPILER": "cl.exe",
                "CMAKE_CXX_COMPILER": "cl.exe"
            },
            "condition": {
                "type": "equals",
                "lhs": "${hostSystemName}",
                "rhs": "Windows"
            }
        },
        {
            "name": "x64-debug",
            "displayName": "x64 Debug",
            "inherits": "windows-base",
            "architecture": {
                "value": "x64",
                "strategy": "external"
            },
            "cacheVariables": {
                "CMAKE_BUILD_TYPE": "Debug"
            }
        },
        {
            "name": "x64-release",
            "displayName": "x64 Release",
            "inherits": "x64-debug",
            "cacheVariables": {
                "CMAKE_BUILD_TYPE": "Release"
            }
        },
        {
            "name": "x86-debug",
            "displayName": "x86 Debug",
            "inherits": "windows-base",
            "architecture": {
                "value": "x86",
                "strategy": "external"
            },
            "cacheVariables": {
                "CMAKE_BUILD_TYPE": "Debug"
            }
        },
        {
            "name": "x86-release",
            "displayName": "x86 Release",
            "inherits": "x86-debug",
            "cacheVariables": {
                "CMAKE_BUILD_TYPE": "Release"
            }
        }
    ]
}
The generator is already set to “Ninja” which is what we want. Note that the build and install directories are housed in a directory called “out”.
I remove the “x86-debug” and “x86-release” sections as I will only have 64-bit targets.
I like to create some build presets in this file, for example to generate a verbose build where I am able to see the actual command-line arguments used by the C++ compiler and by nvcc.
If I’m debugging dependencies I like to add pass “-d explain” to the Ninja generator. This can be done within a build preset using the “nativeToolOptions” property.
Here is my CMakePresets.json for reference:
{
    "version": 3,
    "configurePresets": [
        {
            "name": "windows-base",
            "hidden": true,
            "generator": "Ninja",
            "binaryDir": "${sourceDir}/out/build/${presetName}",
            "installDir": "${sourceDir}/out/install/${presetName}",
            "cacheVariables": {
                "CMAKE_C_COMPILER": "cl.exe",
                "CMAKE_CXX_COMPILER": "cl.exe"
            },
            "condition": {
                "type": "equals",
                "lhs": "${hostSystemName}",
                "rhs": "Windows"
            }
        },
        {
            "name": "x64-debug",
            "displayName": "x64 Debug",
            "inherits": "windows-base",
            "architecture": {
                "value": "x64",
                "strategy": "external"
            },
            "cacheVariables": {
                "CMAKE_BUILD_TYPE": "Debug"
            }
        },
        {
            "name": "x64-release",
            "displayName": "x64 Release",
            "inherits": "x64-debug",
            "cacheVariables": {
                "CMAKE_BUILD_TYPE": "Release"
            }
        }
    ],
    "buildPresets": [
        {
            "name": "x64 Debug",
            "description": "Default",
            "configurePreset": "x64-debug",
            "hidden": false
        },
        {
            "name": "x64 Release",
            "description": "Default",
            "configurePreset": "x64-release",
            "hidden": false
        },
        {
            "name": "x64 Debug Verbose Build",
            "description": "Verbose (--verbose)",
            "configurePreset": "x64-debug",
            "nativeToolOptions": ["-d explain"],
            "verbose": true,
            "hidden": false
        },
        {
            "name": "x64 Release Verbose Build",
            "description": "Verbose (--verbose)",
            "configurePreset": "x64-release",
            "verbose": true,
            "hidden": false
        }
    ]
}
This is how my toolbar looks like after adding the build presets. Note that it may take a while for the changes to take effect. Sometimes I need to restart Visual Studio and wait a bit until my changes are applied.

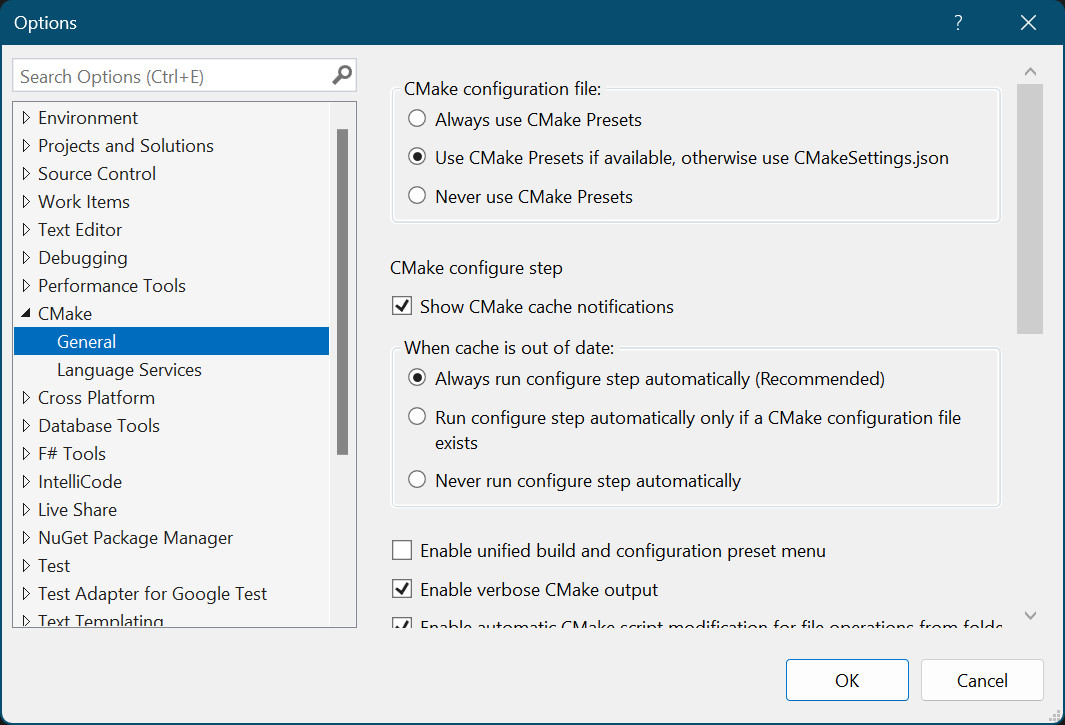
You can also set the toolbar to display both the configuration presets and the build presets. Go to Tools | Options | CMake | General and untick “Enable unified build and configuration preset menu”.
Again, you may need to restart Visual Studio. Once the change takes effect, the toolbar will look like this:

The second dropdown list from the left is for configuration presets, and the dropdown to its right is for build presets.
1.4 launch.vs.json
It is useful to have a launch.vs.json file, for example for specifying arguments to your executable. To create this file, click on Debug | Debug and Launch Settings for <your project’s name>. The file will be created in the .vs directory and will look as follows.
launch.vs.json
{
  "version": "0.2.1",
  "defaults": {},
  "configurations": [
    {
      "type": "default",
      "project": "CMakeLists.txt",
      "projectTarget": "optix_pt.exe",
      "name": "optix_pt.exe"
    }
  ]
}
To pass arguments to your executable, add an “args” property like this:
{
  "version": "0.2.1",
  "defaults": {},
  "configurations": [
    {
      "type": "default",
      "project": "CMakeLists.txt",
      "projectTarget": "optix_pt.exe",
      "name": "optix_pt.exe",
      "args": [
        "configs/scene_selection.json"
      ]
    }
  ]
}
Refer to the launch.vs.json schema reference (C++) for more details.
We will later find another use for this file in the Avoiding any copying of resources section.
2. Project structure
This is what my project structure looks like:
.vs/
  launch.vs.json
configs/
  scene_selection.json
  cornell_box.json
cu/
  device_programs.cu
  path_tracer.cu
external/
  bin/
    glew32.dll
  glfw/
  glm/
  lib/
    glew32.lib
  ...
include/
  utils.h
  cuda_utils.h
out/
  build/
    x64-debug/
    x64-release/
  install/
    x64-debug/
    x64-release/
ptx/
  device_programs.ptx
  path_tracer.ptx
scenes/
shaders/
  basic.fs
  basic.vs
src/
  main.cpp
CMakeLists.txt
CMakePresets.json
The configs directory contains configuration files that my C++ executable will read.
My CUDA sources reside in the cu directory. They will be compiled to PTX and the output placed in the ptx directory.
The external directory contains third-party headers, sources and libraries.
My C++ sources are in the src directory and all my header files (for both C++ and CUDA sources) are in the include directory.
scenes is a symbolic link to a directory on my system that contains the raw data for my scenes, for example in glTF 2.0 format.
The shaders directory contains a couple of very simple OpenGL shaders that are used to display the framebuffer on the screen as a full-screen texture.
Building and installing the project will populate the build and install directories respectively.
3. C++ compilation
Compilation of the C++ executable is nothing special. Everything is pretty much standard procedure.
The CUDAToolkit package is loaded to obtain the CUDA include and library directories. The CUDAToolkit package initialises several variables, including one that contains the full path to nvcc, the NVIDIA CUDA compiler.
I have a large collection of scenes on my system and they take up a lot of storage space. I don’t like to include this data within a particular project. Instead I create a user environment variable called “SCENES_DIR” that holds their location. In my CMakeLists.txt I then create symbolic links to this location, one in the project’s root directory and another in the current binary directory.
CMakeLists.txt
cmake_minimum_required (VERSION 3.28)
project(OptixPathTracer CXX)

set(CMAKE_CXX_STANDARD 20)
set(CMAKE_CXX_STANDARD_REQUIRED ON)

find_package(CUDAToolkit 12.3 REQUIRED)
message("CUDAToolkit_INCLUDE_DIRS    = " ${CUDAToolkit_INCLUDE_DIRS})
message("CUDAToolkit_LIBRARY_DIR     = " ${CUDAToolkit_LIBRARY_DIR})
message("CUDAToolkit_NVCC_EXECUTABLE = " ${CUDAToolkit_NVCC_EXECUTABLE})

set(SOURCES
    src/main.cpp
)

set(EXECUTABLE_NAME optix_pt)

add_executable(${EXECUTABLE_NAME} ${SOURCES})

target_compile_definitions(${EXECUTABLE_NAME} PRIVATE
    GLM_ENABLE_EXPERIMENTAL
    NOMINMAX)

target_include_directories(${EXECUTABLE_NAME} PRIVATE
    include
    external
    external/glm
    ${CUDAToolkit_INCLUDE_DIRS}
    $ENV{OPTIX_PATH_7_1_0}/include
    $ENV{OPTIX_PATH_7_1_0}/SDK
)

target_link_directories(${EXECUTABLE_NAME} PRIVATE
    external/lib
    ${CUDAToolkit_LIBRARY_DIR}
)

target_link_libraries(${EXECUTABLE_NAME}
    cuda
    cudart
    glew32
)

set(GLFW_BUILD_DOCS OFF CACHE BOOL "" FORCE)
set(GLFW_BUILD_TESTS OFF CACHE BOOL "" FORCE)
set(GLFW_BUILD_EXAMPLES OFF CACHE BOOL "" FORCE)

add_subdirectory(external/glfw)
target_link_libraries(${EXECUTABLE_NAME} glfw)

find_package(OpenGL REQUIRED)
target_link_libraries(${EXECUTABLE_NAME} OpenGL::GL)

#
# Create symbolic links to the scenes directory.
#

add_custom_target(symlinks_target
    COMMAND ${CMAKE_COMMAND} -E echo "Creating symbolic links to scenes directory ..."
    COMMAND ${CMAKE_COMMAND} -E create_symlink $ENV{SCENES_DIR} ${CMAKE_CURRENT_SOURCE_DIR}/scenes

    # Create a symbolic link in the current binary directory.
    COMMAND ${CMAKE_COMMAND} -E create_symlink $ENV{SCENES_DIR} scenes
)

add_dependencies(${EXECUTABLE_NAME} symlinks_target)
4. Standard CUDA to PTX workflow
Preliminaries
Specify CUDA in the project line.
project(OptixPathTracer CUDA CXX)
Make a list of the CUDA sources.
set(CUDA_SOURCES
    cu/device_programs.cu
    cu/path_tracer.cu
)
Optionally specify the CUDA C++ standard. If not specified, the C++ standard specified earlier will be used. For example, to use CUDA C++ 2017:
set(CMAKE_CUDA_STANDARD 17)
set(CMAKE_CUDA_STANDARD_REQUIRED ON)
Specify the compilation flags.
set(CMAKE_CUDA_FLAGS "-rdc=true -cudart=none -m64")
Creating an object library target
Create an OBJECT library target for the CUDA sources. This has the effect of compiling the sources without actually generating a library. Specify the CUDA architecture you are targeting (for example “52” means architecture 5.2) and specify that we want to compile to PTX. Finally, specify the include directories.
add_library(generate_ptx OBJECT
    ${CUDA_SOURCES}
)

set_target_properties(generate_ptx PROPERTIES CUDA_ARCHITECTURES 52)
set_target_properties(generate_ptx PROPERTIES CUDA_PTX_COMPILATION ON)

target_include_directories(generate_ptx PRIVATE
    include
    $ENV{OPTIX_PATH_7_1_0}/include
    $ENV{OPTIX_PATH_7_1_0}/SDK
)
NVCC invocation
This is what the resulting nvcc invocation looks like for one of the CUDA source files. The debug version:
C:\PROGRA~1\NVIDIA~2\CUDA\v12.3\bin\nvcc.exe
-forward-unknown-to-host-compiler
-ID:\Projects\optix\optix_pt\include
-I"D:\OptiX\OptiX SDK 7.1.0\include"
-I"D:\OptiX\OptiX SDK 7.1.0\SDK"
-rdc=true
-cudart=none
-m64
-Xcompiler=" -Ob0 -Od /RTC1"
-std=c++20
"--generate-code=arch=compute_52,code=[compute_52,sm_52]"
-Xcompiler=-MDd
-Xcompiler=-Zi
-MD
-MT CMakeFiles\generate_ptx.dir\cu\device_programs.ptx
-MF CMakeFiles\generate_ptx.dir\cu\device_programs.ptx.d
-x cu
-ptx
D:\Projects\optix\optix_pt\cu\device_programs.cu
-o CMakeFiles\generate_ptx.dir\cu\device_programs.ptx
-Xcompiler=-FdCMakeFiles\generate_ptx.dir\,-FS
… and the release version:
C:\PROGRA~1\NVIDIA~2\CUDA\v12.3\bin\nvcc.exe
-forward-unknown-to-host-compiler
-ID:\Projects\optix\optix_pt\include
-I"D:\OptiX\OptiX SDK 7.1.0\include"
-I"D:\OptiX\OptiX SDK 7.1.0\SDK"
-rdc=true
-cudart=none
-m64
-Xcompiler="-O2 -Ob2"
-DNDEBUG
-std=c++20
"--generate-code=arch=compute_52,code=[compute_52,sm_52]"
-Xcompiler=-MD
-MD
-MT CMakeFiles\generate_ptx.dir\cu\device_programs.ptx
-MF CMakeFiles\generate_ptx.dir\cu\device_programs.ptx.d
-x cu
-ptx
D:\Projects\optix\optix_pt\cu\device_programs.cu
-o CMakeFiles\generate_ptx.dir\cu\device_programs.ptx
-Xcompiler=-FdCMakeFiles\generate_ptx.dir\,-FS
We can see that a number of switches were added automatically. These include optimisation options, runtime checks for the debug version, NDEBUG is defined for the release version, the CUDA C++ standard, dependencies and PDB options.
Moreover, the generated PTX files are placed in a subdirectory of the build directory called “CMakeFiles/generate_ptx.dir/cu”. “generate_ptx” is the name of our library target and “cu” is the name of the subdirectory where the CUDA files are located. Unfortunately it does not seem possible to override this behaviour.
Even though we do not have full control over the command-line used to call nvcc, this setup works very decently, especially when considering the extremely short markup required.
Populating the ptx directory
All that’s left to do is to copy the generated PTX files to the ptx directory in the project’s root directory. We’ll use a custom target for this purpose. A dependency is created so that the copying takes place after PTX generation. We also ensure that the copy_ptx_files target executes by making it a dependency of the C++ executable.
add_custom_target(copy_ptx_files
    COMMAND ${CMAKE_COMMAND} -E echo "Copying PTX files to ptx subdirectory ..."
    COMMAND ${CMAKE_COMMAND} -E copy_directory_if_different ${CMAKE_CURRENT_BINARY_DIR}/CMakeFiles/generate_ptx.dir/cu ${CMAKE_CURRENT_SOURCE_DIR}/ptx
)

add_dependencies(copy_ptx_files generate_ptx)
add_dependencies(${EXECUTABLE_NAME} copy_ptx_files)
CMakeLists.txt
The full CMakeLists.txt for this workflow is reproduced below.
cmake_minimum_required (VERSION 3.28)
project(OptixPathTracer CUDA CXX)

set(CMAKE_CXX_STANDARD 20)
set(CMAKE_CXX_STANDARD_REQUIRED ON)

find_package(CUDAToolkit 12.3 REQUIRED)
message("CUDAToolkit_INCLUDE_DIRS    = " ${CUDAToolkit_INCLUDE_DIRS})
message("CUDAToolkit_LIBRARY_DIR     = " ${CUDAToolkit_LIBRARY_DIR})
message("CUDAToolkit_NVCC_EXECUTABLE = " ${CUDAToolkit_NVCC_EXECUTABLE})

set(SOURCES
    src/main.cpp
)

set(EXECUTABLE_NAME optix_pt)

add_executable(${EXECUTABLE_NAME} ${SOURCES})

target_compile_definitions(${EXECUTABLE_NAME} PRIVATE
    GLM_ENABLE_EXPERIMENTAL
    NOMINMAX)

target_include_directories(${EXECUTABLE_NAME} PRIVATE
    include
    external
    external/glm
    ${CUDAToolkit_INCLUDE_DIRS}
    $ENV{OPTIX_PATH_7_1_0}/include
    $ENV{OPTIX_PATH_7_1_0}/SDK
)

target_link_directories(${EXECUTABLE_NAME} PRIVATE
    external/lib
    ${CUDAToolkit_LIBRARY_DIR}
)

target_link_libraries(${EXECUTABLE_NAME}
    cuda
    cudart
    glew32
)

set(GLFW_BUILD_DOCS OFF CACHE BOOL "" FORCE)
set(GLFW_BUILD_TESTS OFF CACHE BOOL "" FORCE)
set(GLFW_BUILD_EXAMPLES OFF CACHE BOOL "" FORCE)

add_subdirectory(external/glfw)
target_link_libraries(${EXECUTABLE_NAME} glfw)

find_package(OpenGL REQUIRED)
target_link_libraries(${EXECUTABLE_NAME} OpenGL::GL)

#
# Create symbolic links to the scenes directory.
#

add_custom_target(symlinks_target
    COMMAND ${CMAKE_COMMAND} -E echo "Creating symbolic links to scenes directory ..."
    COMMAND ${CMAKE_COMMAND} -E create_symlink $ENV{SCENES_DIR} ${CMAKE_CURRENT_SOURCE_DIR}/scenes

    # Create a symbolic link in the current binary directory.
    COMMAND ${CMAKE_COMMAND} -E create_symlink $ENV{SCENES_DIR} scenes
)

add_dependencies(${EXECUTABLE_NAME} symlinks_target)

#
# Compile CUDA to PTX
#

set(CUDA_SOURCES
    cu/device_programs.cu
    cu/path_tracer.cu
)

# Optional
#set(CMAKE_CUDA_STANDARD 17)
#set(CMAKE_CUDA_STANDARD_REQUIRED ON)

set(CMAKE_CUDA_FLAGS "-rdc=true -cudart=none -m64")

add_library(generate_ptx OBJECT
    ${CUDA_SOURCES}
)

set_target_properties(generate_ptx PROPERTIES CUDA_ARCHITECTURES 52)
set_target_properties(generate_ptx PROPERTIES CUDA_PTX_COMPILATION ON)

target_include_directories(generate_ptx PRIVATE
    include
    $ENV{OPTIX_PATH_7_1_0}/include
    $ENV{OPTIX_PATH_7_1_0}/SDK
)

add_custom_target(copy_ptx_files
    COMMAND ${CMAKE_COMMAND} -E echo "Copying PTX files to ptx subdirectory ..."
    COMMAND ${CMAKE_COMMAND} -E copy_directory_if_different ${CMAKE_CURRENT_BINARY_DIR}/CMakeFiles/generate_ptx.dir/cu ${CMAKE_CURRENT_SOURCE_DIR}/ptx
)

add_dependencies(copy_ptx_files generate_ptx)
add_dependencies(${EXECUTABLE_NAME} copy_ptx_files)
5. Advanced CUDA to PTX workflow
It is possible to have full control over the nvcc command line but it takes quite a bit of work. The idea is to call nvcc explicitly, using custom commands and custom targets. This strategy is a bit tricky to implement particularly because we need to set up the dependencies ourselves.
Preliminaries
Specify CUDA in the project line.
project(OptixPathTracer CUDA CXX)
Specify the CUDA sources.
set(CUDA_SOURCES
    cu/device_programs.cu
    cu/path_tracer.cu
)
Create a list of the include directories needed by the CUDA sources.
set(CUDA_INCLUDE_DIRS
    ${CMAKE_CURRENT_SOURCE_DIR}/include
    $ENV{OPTIX_PATH_7_1_0}/include
    $ENV{OPTIX_PATH_7_1_0}/SDK
)
Set the CUDA C++ standard to match the C++ standard.
set(CMAKE_CUDA_STANDARD ${CMAKE_CXX_STANDARD})
Optionally specify the CUDA C++ standard.
set(CMAKE_CUDA_STANDARD 17)
set(CMAKE_CUDA_STANDARD_REQUIRED ON)
Set the CUDA architecture.
set(CMAKE_CUDA_ARCHITECTURES 52)
Set compilation flags common to all builds. Then add build-specific flags. Note that now we need to use a semicolon separator rather than a space. We also indicate that we are compiling to PTX by including the “-ptx” switch.
set(CMAKE_CUDA_FLAGS "-rdc=true;-cudart=none;-m64;-arch=sm_${CMAKE_CUDA_ARCHITECTURES};-std=c++${CMAKE_CUDA_STANDARD};-ptx")

if(CMAKE_BUILD_TYPE STREQUAL "Debug")
    set(CMAKE_CUDA_FLAGS "${CMAKE_CUDA_FLAGS};-lineinfo")
elseif(CMAKE_BUILD_TYPE STREQUAL "Release")
    set(CMAKE_CUDA_FLAGS "${CMAKE_CUDA_FLAGS}")
endif()
Generating dependency files
Create a macro for producing a dependency file (out_d) for a given .cu file (in_cu) and .ptx file (target_ptx) combination. The macro consists of a custom command and a custom target.
In the custom command, -M generates the dependency file without compiling the CUDA source file. -MF specifies the name of the dependency file. -MT specifies the name of the target in the dependency file itself. The include directories are passed in using a generator expression operating on CUDA_INCLUDE_DIRS. COMMAND_EXPAND_LISTS is needed for proper expansion of CUDA_INCLUDE_DIRS. The DEPENDS statement ensures that the dependency file will be regenerated whenever the CUDA source file changes.
The custom target uses a dummy name passed in by the macro’s caller. The dependency on out_d is there so that the custom command is called. We also make the custom target depend on the C++ target so that the custom target is generated.
macro(add_dep_target target_name in_cu out_d target_ptx)
    # Regenerate the dependency file if the cu file changes.
    add_custom_command(
        OUTPUT ${out_d}
        COMMAND ${CMAKE_COMMAND} -E echo "Generating ${out_d}"
        COMMAND ${CUDAToolkit_NVCC_EXECUTABLE} -M -MF ${out_d} -MT ${target_ptx} "$<LIST:TRANSFORM,${CUDA_INCLUDE_DIRS},PREPEND,-I>" ${in_cu}
        DEPENDS ${in_cu}
        VERBATIM
        COMMAND_EXPAND_LISTS
    )

    add_custom_target(${target_name} DEPENDS ${out_d})
    add_dependencies(${EXECUTABLE_NAME} ${target_name})
endmacro()
Generating PTX files
Create a macro for compiling the the given .cu file (in_cu) to a .ptx file (out_ptx) using the dependency file in_d. Again, the macro consists of a custom command and a custom target. We pass in the output directory and compilation flags, specify a PTX output, and specify the include directories as in the previous macro. The DEPENDS statement ensures that the PTX file will be regenerated whenever the CUDA source file changes. I decided not to have separate directories for the PTX files generated by the debug and release builds, so a build will overwrite the files generated by a previous different build.
The custom target uses a dummy name passed in by the macro’s caller. The target depends on out_ptx so that the custom command is called. Here as well, we make the custom target depend on the C++ target so that it is generated.
macro(add_target target_name in_cu in_d out_ptx)
    # Regenerate the ptx file if either the cu or any file listed in the dependency file changes.
    add_custom_command(
        OUTPUT ${out_ptx}
        COMMAND ${CMAKE_COMMAND} -E echo "Generating ${out_ptx}"
        COMMAND ${CUDAToolkit_NVCC_EXECUTABLE} -odir ${CMAKE_CURRENT_BINARY_DIR}/ptx ${CMAKE_CUDA_FLAGS} -ptx "$<LIST:TRANSFORM,${CUDA_INCLUDE_DIRS},PREPEND,-I>" ${in_cu}
        DEPENDS ${in_cu}
        DEPFILE ${in_d}
        VERBATIM
        COMMAND_EXPAND_LISTS
    )

    add_custom_target(${target_name} DEPENDS ${out_ptx})
    add_dependencies(${EXECUTABLE_NAME} ${target_name})
endmacro()
Execution
Loop over the CUDA sources, calling the two macros we defined for each source file. We place the generated dependency files and PTX files in subdirectories of the current binary directory called ptx_deps and ptx respectively.
foreach(FILE ${CUDA_SOURCES})
    cmake_path(GET FILE STEM file_stem)

    # Generate dependency file.
    add_dep_target(generate_${file_stem}_d ${CMAKE_CURRENT_SOURCE_DIR}/${FILE} ${CMAKE_CURRENT_BINARY_DIR}/ptx_deps/${file_stem}.d ${CMAKE_CURRENT_BINARY_DIR}/ptx/${file_stem}.ptx)

    # Generate ptx file.
    add_target(generate_${file_stem}_ptx ${CMAKE_CURRENT_SOURCE_DIR}/${FILE} ${CMAKE_CURRENT_BINARY_DIR}/ptx_deps/${file_stem}.d ${CMAKE_CURRENT_BINARY_DIR}/ptx/${file_stem}.ptx)
endforeach()
NVCC invocation
This is what the nvcc invocations look like when generating the dependency file and the PTX file for one of the CUDA sources for the debug build. Everything looks good!
"C:\Program Files\NVIDIA GPU Computing Toolkit\CUDA\v12.3\bin\nvcc.exe"
-M
-MF D:/Projects/optix/optix_pt/ptx/device_programs.d
-MT D:/Projects/optix/optix_pt/ptx/device_programs.ptx
-ID:/Projects/optix/optix_pt/include "-ID:\OptiX\OptiX SDK 7.1.0/include" "-ID:\OptiX\OptiX SDK 7.1.0/SDK"
D:/Projects/optix/optix_pt/cu/device_programs.cu"

"C:\Program Files\NVIDIA GPU Computing Toolkit\CUDA\v12.3\bin\nvcc.exe"
-odir D:/Projects/optix/optix_pt/ptx
-rdc=true
-cudart=none
-m64
-arch=sm_52
-std=c++20
-ptx
-lineinfo
-ID:/Projects/optix/optix_pt/include "-ID:\OptiX\OptiX SDK 7.1.0/include" "-ID:\OptiX\OptiX SDK 7.1.0/SDK"
D:/Projects/optix/optix_pt/cu/device_programs.cu
Populating the ptx directory
Finally we create a custom target to copy the generated PTX files to the ptx directory in the project’s root directory. We create dependencies so that this copying is performed after all the PTX files have been generated.
add_custom_target(copy_ptx_files
    COMMAND ${CMAKE_COMMAND} -E echo "Copying PTX files to ptx subdirectory ..."
    COMMAND ${CMAKE_COMMAND} -E copy_directory_if_different ${CMAKE_CURRENT_BINARY_DIR}/ptx ${CMAKE_CURRENT_SOURCE_DIR}/ptx
)

foreach(FILE ${CUDA_SOURCES})
    cmake_path(GET FILE STEM file_stem)
    add_dependencies(copy_ptx_files generate_${file_stem}_ptx)
endforeach()

add_dependencies(${EXECUTABLE_NAME} copy_ptx_files)
CMakeLists.txt
The full CMakeLists.txt for this workflow is reproduced below.
cmake_minimum_required (VERSION 3.28)
project(OptixPathTracer CUDA CXX)

set(CMAKE_CXX_STANDARD 20)
set(CMAKE_CXX_STANDARD_REQUIRED ON)

find_package(CUDAToolkit 12.3 REQUIRED)
message("CUDAToolkit_INCLUDE_DIRS    = " ${CUDAToolkit_INCLUDE_DIRS})
message("CUDAToolkit_LIBRARY_DIR     = " ${CUDAToolkit_LIBRARY_DIR})
message("CUDAToolkit_NVCC_EXECUTABLE = " ${CUDAToolkit_NVCC_EXECUTABLE})

set(SOURCES
    src/main.cpp
)

set(EXECUTABLE_NAME optix_pt)

add_executable(${EXECUTABLE_NAME} ${SOURCES})

target_compile_definitions(${EXECUTABLE_NAME} PRIVATE
    GLM_ENABLE_EXPERIMENTAL
    NOMINMAX)

target_include_directories(${EXECUTABLE_NAME} PRIVATE
    include
    external
    external/glm
    ${CUDAToolkit_INCLUDE_DIRS}
    $ENV{OPTIX_PATH_7_1_0}/include
    $ENV{OPTIX_PATH_7_1_0}/SDK
)

target_link_directories(${EXECUTABLE_NAME} PRIVATE
    external/lib
    ${CUDAToolkit_LIBRARY_DIR}
)

target_link_libraries(${EXECUTABLE_NAME}
    cuda
    cudart
    glew32
)

set(GLFW_BUILD_DOCS OFF CACHE BOOL "" FORCE)
set(GLFW_BUILD_TESTS OFF CACHE BOOL "" FORCE)
set(GLFW_BUILD_EXAMPLES OFF CACHE BOOL "" FORCE)

add_subdirectory(external/glfw)
target_link_libraries(${EXECUTABLE_NAME} glfw)

find_package(OpenGL REQUIRED)
target_link_libraries(${EXECUTABLE_NAME} OpenGL::GL)

#
# Create symbolic links to the scenes directory.
#

add_custom_target(symlinks_target
    COMMAND ${CMAKE_COMMAND} -E echo "Creating symbolic links to scenes directory ..."
    COMMAND ${CMAKE_COMMAND} -E create_symlink $ENV{SCENES_DIR} ${CMAKE_CURRENT_SOURCE_DIR}/scenes

    # Create a symbolic link in the current binary directory.
    COMMAND ${CMAKE_COMMAND} -E create_symlink $ENV{SCENES_DIR} scenes
)

add_dependencies(${EXECUTABLE_NAME} symlinks_target)

#
# Compile CUDA to PTX
#

set(CUDA_SOURCES
    cu/device_programs.cu
    cu/path_tracer.cu
)

set(CUDA_INCLUDE_DIRS
    ${CMAKE_CURRENT_SOURCE_DIR}/include
    $ENV{OPTIX_PATH_7_1_0}/include
    $ENV{OPTIX_PATH_7_1_0}/SDK
)

set(CMAKE_CUDA_STANDARD ${CMAKE_CXX_STANDARD})

# Optional
#set(CMAKE_CUDA_STANDARD 17)
#set(CMAKE_CUDA_STANDARD_REQUIRED ON)

set(CMAKE_CUDA_ARCHITECTURES 52)

# Set compilation flags common to all builds.
set(CMAKE_CUDA_FLAGS "-rdc=true;-cudart=none;-m64;-arch=sm_${CMAKE_CUDA_ARCHITECTURES};-std=c++${CMAKE_CUDA_STANDARD};-ptx")

# Add specific debug/release compilation flags.
if(CMAKE_BUILD_TYPE STREQUAL "Debug")
    set(CMAKE_CUDA_FLAGS "${CMAKE_CUDA_FLAGS};-lineinfo")
elseif(CMAKE_BUILD_TYPE STREQUAL "Release")
    set(CMAKE_CUDA_FLAGS "${CMAKE_CUDA_FLAGS}")
endif()

macro(add_dep_target target_name in_cu out_d target_ptx)
    # Regenerate the dependency file if the cu file changes.
    add_custom_command(
        OUTPUT ${out_d}
        COMMAND ${CMAKE_COMMAND} -E echo "Generating ${out_d}"
        COMMAND ${CUDAToolkit_NVCC_EXECUTABLE} -M -MF ${out_d} -MT ${target_ptx} "$<LIST:TRANSFORM,${CUDA_INCLUDE_DIRS},PREPEND,-I>" ${in_cu}
        DEPENDS ${in_cu}
        VERBATIM
        COMMAND_EXPAND_LISTS
    )

    add_custom_target(${target_name} DEPENDS ${out_d})
    add_dependencies(${EXECUTABLE_NAME} ${target_name})
endmacro()

macro(add_target target_name in_cu in_d out_ptx)
    # Regenerate the ptx file if either the cu or any file listed in the dependency file changes.
    add_custom_command(
        OUTPUT ${out_ptx}
        COMMAND ${CMAKE_COMMAND} -E echo "Generating ${out_ptx}"
        COMMAND ${CUDAToolkit_NVCC_EXECUTABLE} ${CMAKE_CUDA_FLAGS} "$<LIST:TRANSFORM,${CUDA_INCLUDE_DIRS},PREPEND,-I>" ${in_cu}
        DEPENDS ${in_cu}
        DEPFILE ${in_d}
        VERBATIM
        COMMAND_EXPAND_LISTS
    )

    add_custom_target(${target_name} DEPENDS ${out_ptx})
    add_dependencies(${EXECUTABLE_NAME} ${target_name})
endmacro()

foreach(FILE ${CUDA_SOURCES})
    cmake_path(GET FILE STEM file_stem)

    # Generate dependency file.
    add_dep_target(generate_${file_stem}_d ${CMAKE_CURRENT_SOURCE_DIR}/${FILE} ${CMAKE_CURRENT_BINARY_DIR}/ptx_deps/${file_stem}.d ${CMAKE_CURRENT_BINARY_DIR}/ptx/${file_stem}.ptx)

    # Generate ptx file.
    add_target(generate_${file_stem}_ptx ${CMAKE_CURRENT_SOURCE_DIR}/${FILE} ${CMAKE_CURRENT_BINARY_DIR}/ptx_deps/${file_stem}.d ${CMAKE_CURRENT_BINARY_DIR}/ptx/${file_stem}.ptx)
endforeach()

add_custom_target(copy_ptx_files
    COMMAND ${CMAKE_COMMAND} -E echo "Copying PTX files to ptx subdirectory ..."
    COMMAND ${CMAKE_COMMAND} -E copy_directory_if_different ${CMAKE_CURRENT_BINARY_DIR}/ptx ${CMAKE_CURRENT_SOURCE_DIR}/ptx
)

foreach(FILE ${CUDA_SOURCES})
    cmake_path(GET FILE STEM file_stem)
    add_dependencies(copy_ptx_files generate_${file_stem}_ptx)
endforeach()

add_dependencies(${EXECUTABLE_NAME} copy_ptx_files)
6. Copying resources
Once everything has been compiled successfully I copy some resources to the build directory. My C++ executable needs these resources and needs to find some of them in specific subdirectories relative to it.
I create a custom target for copying the resources. I always use *_if_different commands here as they make sure that files are only copied when they are modified or missing.
When using the standard workflow (Standard CUDA to PTX workflow) use the following:
add_custom_target(copy_files
    COMMAND ${CMAKE_COMMAND} -E echo "Copying files to output directory ..."
    COMMAND ${CMAKE_COMMAND} -E copy_directory_if_different ${CMAKE_CURRENT_SOURCE_DIR}/configs ${CMAKE_CURRENT_BINARY_DIR}/configs
    COMMAND ${CMAKE_COMMAND} -E copy_directory_if_different ${CMAKE_CURRENT_SOURCE_DIR}/shaders ${CMAKE_CURRENT_BINARY_DIR}/shaders
    COMMAND ${CMAKE_COMMAND} -E copy_directory_if_different ${CMAKE_CURRENT_SOURCE_DIR}/ptx ${CMAKE_CURRENT_BINARY_DIR}/ptx
    COMMAND ${CMAKE_COMMAND} -E copy_if_different ${CMAKE_CURRENT_SOURCE_DIR}/external/bin/glew32.dll ${CMAKE_CURRENT_BINARY_DIR}
)

add_dependencies(copy_files copy_ptx_files)
add_dependencies(${EXECUTABLE_NAME} copy_files)
Since we are copying the ptx directory, we use dependencies to make sure that the copying takes place after all the PTX files have been generated and are in the ptx subdirectory.
When using the advanced workflow (Advanced CUDA to PTX workflow) use this instead:
add_custom_target(copy_files
    COMMAND ${CMAKE_COMMAND} -E echo "Copying files to output directory ..."
    COMMAND ${CMAKE_COMMAND} -E copy_directory_if_different ${CMAKE_CURRENT_SOURCE_DIR}/configs ${CMAKE_CURRENT_BINARY_DIR}/configs
    COMMAND ${CMAKE_COMMAND} -E copy_directory_if_different ${CMAKE_CURRENT_SOURCE_DIR}/shaders ${CMAKE_CURRENT_BINARY_DIR}/shaders
    COMMAND ${CMAKE_COMMAND} -E copy_if_different ${CMAKE_CURRENT_SOURCE_DIR}/external/bin/glew32.dll ${CMAKE_CURRENT_BINARY_DIR}
)

add_dependencies(${EXECUTABLE_NAME} copy_files)
In this workflow the PTX files are already in place in the ptx directory in the current binary directory, so we do not need to copy them.
7. Avoiding any copying of resources
This section is Windows specific.
Although I am only copying the resources if they changed, for large projects this may not be convenient since the resources are being replicated (therefore taking up space) and the copying may be time consuming.
On Windows there is a convenient solution. The working directory (“currentDir”) for your executable and the PATH environment variable (“env”) can be specified in the launch.vs.json file (see section launch.vs.json). In this way no copying of resources is required (and the markup described in Copying resources is not needed). The C++ executable still resides in the build directory and you can run it and debug it from within Visual Studio as you do normally.
launch.vs.json
{
  "version": "0.2.1",
  "defaults": {},
  "configurations": [
    {
      "type": "default",
      "project": "CMakeLists.txt",
      "projectTarget": "optix_pt.exe",
      "name": "optix_pt.exe",
      "args": [
        "configs/scene_selection.json"
      ],
      "currentDir": "${workspaceRoot}",
      "env": {
        "PATH": "%PATH%;${workspaceRoot}/external/bin"
      }
    }
  ]
}
8. Cleaning
Clicking on Build | Clean All in Visual Studio will remove from the current binary directory all the targets and items marked “OUTPUT” in CMakeLists.txt, so there is very little to do here. We just need to add rules for the resources we copied to the current binary directory and for the symbolic link we created there:
set_property(TARGET ${EXECUTABLE_NAME} APPEND PROPERTY ADDITIONAL_CLEAN_FILES configs)
set_property(TARGET ${EXECUTABLE_NAME} APPEND PROPERTY ADDITIONAL_CLEAN_FILES shaders)
set_property(TARGET ${EXECUTABLE_NAME} APPEND PROPERTY ADDITIONAL_CLEAN_FILES glew32.dll)
set_property(TARGET ${EXECUTABLE_NAME} APPEND PROPERTY ADDITIONAL_CLEAN_FILES scenes)
9. Installation
To support an “install” target we list any targets, files and directories needed. I create the “scenes” symbolic link in the install directory too.
install(TARGETS ${EXECUTABLE_NAME} DESTINATION .)
install(DIRECTORY ${CMAKE_CURRENT_SOURCE_DIR}/configs DESTINATION .)
install(DIRECTORY ${CMAKE_CURRENT_SOURCE_DIR}/ptx DESTINATION .)
install(DIRECTORY ${CMAKE_CURRENT_SOURCE_DIR}/shaders DESTINATION .)
install(FILES ${CMAKE_CURRENT_SOURCE_DIR}/external/bin/glew32.dll DESTINATION .)

cmake_path(SET out_path $ENV{SCENES_DIR})
install(CODE "execute_process(COMMAND \"${CMAKE_COMMAND}\" -E create_symlink ${out_path} ${CMAKE_INSTALL_PREFIX}/scenes)")
To avoid running the install target on subdirectory projects, specify “EXCLUDE_FROM_ALL” on the add_subdirectory() line:
add_subdirectory(external/glfw EXCLUDE_FROM_ALL)
The installation can be tested out from a terminal by navigating to the project’s root directory and running:
cmake --build out/build/x64-debug --target install
This correctly populates the out/install/x64-debug directory:

10. Conclusion
This article describes two workflows for compiling OptiX CUDA source files to PTX in a CMake project.
The Standard CUDA to PTX workflow is simple and straightforward but relinquishes some control over the way nvcc is invoked.
The Advanced CUDA to PTX workflow is more complex but provides full control over the nvcc command line.